
 Feather Lady ATC - finished size is 3.5 x 2.5 inches
All stamps are by Lost Coast Rubber Stamps
(I purchased my stamps along with many of the supplies
used in this tutorial at Blockheads Rubber Stamps.)
This image was created using 3 separate stamp designs by Lost Coast Designs and the masking technique. This process allows you to create overlapping images; where you stamp the items closest to the foreground first and then mask off each successive image before stamping the next image until you reach your furthest background image last.
Masks are created and used to cover or “mask” a previously stamped image so that another stamp image can be added to your scene, without inking over the image/ images you have previously stamped. Masks allow you to layer your stamped scene and gives you greater versatility with your collection of stamp images.
Masks can be created from a variety of items, some of those are: thin paper, post it notes, transparency film, or specialty products such as Masking Magic or Eclipse Masking Tape. These specialty products have a low tack adhesive on the back that allows the mask to stay securely in place while you stamp and then can be remove easily when you are done. Masks can be easily stored to use again and again.
It is best to avoid using cardstock or heavyweight papers for making a stamp mask since these are prone to causing the “halo” effect and will not give you a seamless finish between stamped images. When creating your mask you should consider the thickness of the paper you are using since this will determine how close to the edge you need to trim your image. You will see a “halo” or blank area between the images you are stamping; if the mask is too thick or you did not trim enough of the edge away. The Halo is created when the ink on the new image you are stamping over the mask is not able to make contact with the edge of the previously stamped image. This may be a desired effect in some stamp-work (see the last image of the dragon ATC below); however, I find trimming the mask to slightly inside the stamped edge will allow the images to appear as if they fit seamlessly together once they are stamped.
Tip – With layered stamping it is very helpful to use a stamp positioned so that you can line your images up just where you want them. I favor using the stamp-a-ma-jig but this is a personal preference on my part and it is one tool I’ve never regretted purchasing.
 Masking Materials Used
Step 1 – gather your stamping and masking items and consider what you want your stamped scene to look like. For this scene I will be using 3 stamps and I know I want the lady closest to me and the script as the background, so I will stamp the lady first, the gateway second and the script last.
Tip - If you are unsure in what order you wish your scene to be, go ahead and stamp masks for all the stamps you wish to consider using, then you can arrange and move the masks around to compose your scene before you begin stamping.
Step 2 – Stamp your images onto your masking material and trim them slightly within the stamped edge to avoid getting a “halo” as you are stamping. My choice is Eclipse Masking Tape since it is a sturdy lightweight paper that has a light tacky backing that allows my masks to stay in place while I’m stamping. For this project I have stamped a mask for the mannequin and the gateway only; since those are the images that will need to be protected from other images.
 Stamped Lady with Cut Masks
The Lady has been stamped in brown and
the two masks are stamped in black.
Step 3 – Stamp the first image of your scene on the stamping surface of your choice. Remember to stamp the items that will be in the foreground (the closest to you) first. I have stamped the lady in brown ink so you can tell her apart from her masked image which was stamped in black ink. After the ink is dry, apply the matching mask directly over the stamped image so it is protected from the next image to be stamped.
 Using the Stamp-A-Ma-Jig stamp positioner
The lady image has already been stamped and masked off.
The new image to be overstamped will be the gateway.
(the mask will protect the first image from other images being stamped around it)
NOTE - I am left-handed so this is the stamping position that works for me, if you are right-handed you might find that flipping the stamp positioner the other way works best for you.
Step 4 – Stamp the next image onto the stamp positioner’s plastic template according to your stamp positioner’s instructions. Line the new image over your masked off image to find the correct placement and then slide the stamp positioner into place and hold it there so it does not move. Remove the plastic template, Ink up your stamp and stamp your next image.
Tip – continue to securely hold the positioner in place while you carefully pull the stamp away. If you did not get a good impression and the postitioner has not been shifted out of place, you can re-stamp the image. It can be a bit tricky to do but I’ve had an excellent success rate in doing this.
 Background Stamping of the Last Image
This is the final image being stamped the background text stamp.
Step 5 – Repeat this process (stamp, mask, find the placement of the next stamp) with all your images, remembering to add the mask to a previously stamped image before stamping the next image. Also remember to protect any surrounding areas your masks may not cover. In this project, I realized that the final background script stamp would accidentally stamp an area outside the gateway on several sides so I protected the outside edges of the entire work area with pink note cards before stamping the last image. This is a good way to recycle scrap paper or old post-it notes before you throw them away.
 Feather Lady in the Gateway
Step 6 – Remove all the masking materials to see your stamped design area. I have stamped these three items with different colors of ink so you can easily see that 3 stamps were used to create this composite design. The masks protected each individual image so that it appears that the fancy lady is in front of the gateway and that there is a slightly tilted scrip message behind the gateway.
Tip – Keep your masks for another time. You have gone through the trouble of stamping and cutting out your masks so save them to use again. It does not matter that they have been stamped over in this project since they will still protect each image many more times going forward. Most of my stamps are unmounted and kept in note books so I keep my masks in sheet protectors with my stamps so I can easily find them for the next time.
 The Finished - Feather Lady ATC
The finished ATC was stamped all in black.
This ATC was created using 3 separate stamp designs by Lost Coast Designs, using the masking technique. To create this ATC; I first stamped the feather lady from the Mini Flying Ladies Set.
Once the ink had dried on the lady I masked her off and then stamped the gateway.
The gateway was then masked off and the script text was stamped in the background.
I removed the masks and colored the ATC with a combination of pastel pencils, decorative chalk and markers.
All stamps by Lost Coast Designs
-Mini flying Ladies Set
-ATC Shrines
-Word Backgrounds for ATC’s Set 1Masking medium was Eclipse Masking Tape
Stamping ink was Versafine in Onyx Black.
Additional ATC's using the masking technique and Loast Coast Rubber Stamp Images
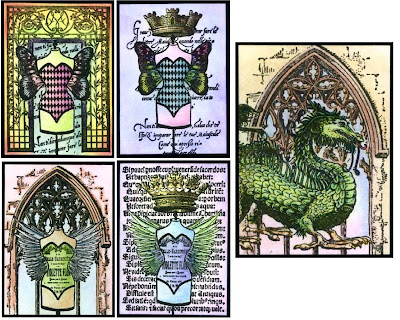 I've added wings on all 4 and crowns to 2 then
a fun background to each of the mannequins.
I extended the mask out just a bit on the dragon's head
to create a bit of a "halo" effect to make it appear as if he is
head butting and breaking out of the window.
 I've added wings on all 4 and crowns to 2 then
a fun background to each of the mannequins.
I extended the mask out just a bit on the dragon's head
to create a bit of a "halo" effect to make it appear as if he is
head butting and breaking out of the window.
Grins and Giggles,
Evelyn (EKDuncan)
I absolutely understand now how to make stunning ATC's! I'm going to host a swap at Swap-bot using this technique and direct people to this blog. Thank you!!
ReplyDeleteI'm so glad you found the tutorial useful and wish you and your swappers lots of fun on your challenge.
ReplyDeleteGrins and Giggles,
Evelyn